Saturday, February 27, 2010

Simplicity easy chic suit skirt part 2


Today’s Sewing Philosophy: stop, look, and listen (to yourself).

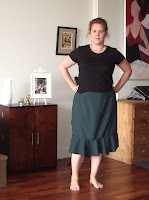
Today I have stitched the darts and side seams. The last time I made this skirt it turned out too big, and even though I’ve taken it in to sit properly on my hips, it still feels a bit ‘baggy’ and frumpy. So I made sure to stop and try on after I did the side seams this time. As you can see from the first 2 photos, it still looks a bit loose, especially around the hips. Before going any further, I thought I’d pin the flounce on to see how that affected the overall look. I am glad I did – look how frumpy this is!

Looking at the pattern envelope, the skirt is supposed to stop mid patella. I re-pinned a few times until I got the length right. This told me I needed to take out a (whopping) 7 cm of length. That was more than I thought I could manage by just pinning and cutting. So I unpicked the side seams, folded the pattern at the designated spot, pinned the darts in the pattern, laid the paper pattern over the fabric, and re-cut the pieces.

I then re-stitched the side seams, and have decided that is enough for today.

P.S. Photos apear to have uploaded in reverse order - opps!

Saturday, February 13, 2010

Simplicity easy chic suit 4885: Part 1


First things first – the pattern:

http://www.simplicity.com/Search.aspx?SearchTerm=4885&x=0&y=0


I have previously made the pants, quite successfully and the skirt, less successfully. I have a First Draft* of the jacket and a muslin of the top on the mannequin, and it’s my intention to make a complete 3 piece suit form this pattern together with a couple of the tops.
I decided to have another go at the skirt, using some mystery green suiting fabric that has matured nicely in my collection. I checked my measurements and decided that I fall between the 20 – 22 sizes on this pattern. Then I remembered something from Carolyn’s interview on Gertie’s blog, and took my waist, hip and thigh measurements while sitting down – after all, I want this to be a skirt for working, and I work sitting down. Based on the sitting measurements, I decided to cut the size 22. If it turned out too big (as the first one did) I could always cut it down half-a-size.
After cutting the pieces, I pinned together the main skirt part, leaving off the flounce. Looking in the mirror, standing, walking and sitting, it seems to be the right size.
Next I cut the interfacing and pinned it to the skirt facings. That’s enough work on the skirt today.
Next I returned to the top muslin. I had previously pinned it in where I thought it was a bit loose around the bust/back. Again keeping Carolyn’s advice in mind, I tried the top on sitting down. This helped me to decide that I had taken it in too much and it was a little bit too snug for sitting and typing in at work. So, I will be taking it in about 2 ¾ cm at each underarm seam, but only at the under arm for about 4 -5 cm; the rest seems right. Next I’ll sew up the new seams, and get Hubby to pin me in where the zip goes to double check.
Finally, I pinned in the shoulder pads I bought for the jacket. I had previously suspect the shoulders are too broad, and with the shoulder pads in pace, I am quite sure they need to be taken in by about 1.5 cm. SO I have unpicked the sleeves and will be fiddling with about resetting them in an effort to find the right fit.

*A First Draft is when I hope to both work out fit issues and that the garment turns out presentable and wearable, but use inexpensive fabric in case I have to bin it.

Tuesday, February 09, 2010

skirt + top = summer frock


I bought the skirt part of this dress on sale at a Salvos that was closing down. It was the first thing I bought expressly to re-fashion. It was a size 12, i.e. 2 sizes too small for me, but I liked the colour, shape and nifty embroidery detail at the hem. I started by removing the waistband, leaving me with 3 tiers. I was going to combine it with a men's business shirt I bought at the same time to make a shirt-dress, but I couldn't figure out how to do it nicely.
The top was #3 in a series of 4 tops made from a Very Easy Vogue pattern. It was a bit gapey at the front and I was not very happy with it. Although it didn't photo so well, I quite liked the narrow stripes, and thought I'd keep it as a vest to wear over long sleeved tops in the winter. When the shirt-dress was obviously not coming together right, I thought of this top instead.
A quick finish of the skirt's raw edges, another quick hem around the waist/hip line and voila a new summer dress!

Sunday, February 07, 2010

A new jacket at Salvos


2 Saturdays ago, quite on a whim, Hubby and I stopped by our local Salvos shop. We found loads of things for him, as we always seem to do and a few for me too: 3 patterns, a length of fabric, and a brand new with tags on “Mechanical Jacket” from emerge brand.

A quick Google tells me that emerge is sold through ezibuy. The tag says RRP $49.95, and I got it for $15. I wonder if someone bought it, was not happy with it, and then never got around to returning it, so it ended up donated. So even though its form an op-shop, since it’s brand new I feel I ought to hand over my get-out-of-jail-free card (I lasted a month! But it’s my first pledge).

I have also been sewing and have a refashion semi-complete to show you all in the next week or so. My M-i-L has been visiting, so no sewing for me this weekend, but we did buy her a vintage dressing gown pattern.