


I have just found Syrena's blog via the Sew Retro blog today: http://balcsgirllovesvintage.blogspot.com/
What piqued my interest is that she describes herself thus: "a stay at home mom and housewife with traditional values that reflect those of the mid 20th century when women were homemakers & men were the breadwinners."
While I share Syrena's love of and fascination with sewing and vintage fashions, styling and sensibilities, I yet I also find myself the breadwinner, with a stay-at-home student and homemaker husband, and no desire to procreate.
I just thought this was interesting, the way people can share similar values on some things (modesty for example) and be so polar opposite on others.
Viva la diversite!
Sunday, October 31, 2010
Monday, October 18, 2010
National Clothes Swap Day – only 6 more sleeps!
Monday 25 October is National Clothes Swap day, and I will be heading to The Clothing Exchange’s Melbourne event at Federation Square. I am very excited about this, as I have shrunk out of some of my favourite clothes, and haven’t the cash to spend on new ones.
Friday night, while Hubby is on a boys’ night out, I will review and edit my wardrobe into the following categories:
After my wardrobe cull I will have a better idea of what’s missing in my wardrobe, and what colours, cuts and fabrics to look for. I am very excited. I hope I find some nice things to take home with me.
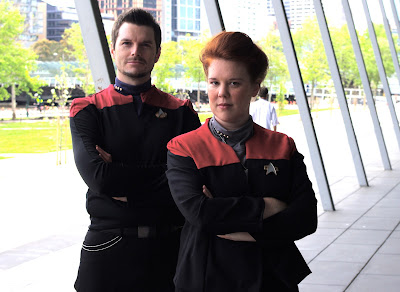
P.S. The Janeway Project was a huge success – watch this space for details, but here is a sneak peak. How handsome is my hubby!
- keep;
- swap;
- sell;
- refashion;
- donate.
My wish list for the “buying” part of the swap event off the top of my head is:
- Jeans (I have 2 pr, so one more would be good)
- Capri pants or dress shorts
- Dress (es)
- Skinny belt(s)
- A full skirt

Monday, October 11, 2010
The Janeway Project – that hair
Over the course of the 7 seasons of Voyager, Janeway sport 3 distincy “everyday” hairstyles (there are others for specific scenarios, but as I am doing her day to day look, I will gloss over those for now). They are:
Since I am not prepared at this stage to cut my hair into a Janeway bob, that leaves chignon or victory rolls. Knowing that I like to have my hair off my neck when it gets warm, and knowing it is likely to get warm in the convention centre, this year I am opting for the chignon.
Luckily, I have very 1940’s hair, with a great deal of body and wave. I have been experimenting and practicing, and I am quietly confident that I will be able to pull off a convincing Janeway chignon – watch this space.
 |
| Victory rolls |
 |
| The chignon |
 |
| The bob |
Since I am not prepared at this stage to cut my hair into a Janeway bob, that leaves chignon or victory rolls. Knowing that I like to have my hair off my neck when it gets warm, and knowing it is likely to get warm in the convention centre, this year I am opting for the chignon.
Luckily, I have very 1940’s hair, with a great deal of body and wave. I have been experimenting and practicing, and I am quietly confident that I will be able to pull off a convincing Janeway chignon – watch this space.
Wednesday, September 29, 2010
The Janeway Project - muslin update

On the left side you can see the modifications I have made. First I re-shaped the front opening and neckline to better reflect the Janeway Jacket.


In these photos you can also see where Helpful Hubby has drawn on the seam lines for the colour division.
Next I unpicked the muslin and cut along those seam lines. Next I re-traced the now divided pattern pieces, remembering to add the 1.5 am seam allowance at each division.
So, this week I will buy the fashion fabric and over the weekend I hope to cut and pin the body pieces from the fashion fabric and then, if I have time, muslin the new sleeve before cutting it in the fashion fabric.
Saturday, September 25, 2010
An answer to a wardrobe dilemma
Although I don't mention it here very often, I am mid-way through my weight-loss journey. I have lost a little over a dress size since Christmas 09, and intend to lose one more over the (Southern) summer. While I am thrilled with my results thus far, I have shrunk faster than my sewing, or my wallet, can keep up with, which has left me with lots of lovely clothes that fit poorly, and a limited number that make me feel good in them. Nor do I want to spend a lot of time and money on garments that I plan to shrink out of within 6 - 12 months.This left me with a wardrobe dilemma. I do frequent my local Op Shops semi-regularly, but the sizes and styles available can be limited.
And then I stumbled upon a solution -
The details of the Melbourne event are below. For other locations, check out the Clothing Exchange page: http://www.clothingexchange.com.au/Clothing_Exchange/Events.html
The Clothing Exchange’

And then I stumbled upon a solution -
National Clothes Swap day!
The details of the Melbourne event are below. For other locations, check out the Clothing Exchange page: http://www.clothingexchange.com.au/Clothing_Exchange/Events.html
The Clothing Exchange’
A swapping event for the ladies
Admission $25
Check-in 6.30pm
Monday 25th October
BMW Edge, Federation Square
Melbourne
Partners Ethical Clothing Australia, Fitted for work and Frankie Magazine

Wednesday, September 08, 2010
The Janeway Project: Phase 1
I plan to attend the Saturday of Armageddon Pop Culture Expo dressed as Capt Janeway from Star Trek Voyager. I have 5 weekends left to construct my costume (I ought to have started earlier, but there’s nothing like a deadline to motivate a seamstress).
Phase 1 is the distinctive jacket as seen here:

http://memory-alpha.org/wiki/Kathryn_Janeway
I will be using a Burda Style magazine pattern. The first step is to do a ‘first draft’ or mock up so I can work out Burda’s at times mystifying instructions, tweak the pattern for fit, and then tweak the pattern to achieve the signature Star Trek parti-coloured finish.
Then I’ll be buying fabric and beginning construction. If I get the jacket completed I will look at an under-shirt; if I have insufficient time, I will use a grey marl round neck t-shirt I already own. I have already bought the communicator badge and captain's pips from an online store, and the red hair, well, that part is easy.
Friday, September 03, 2010
Wardrobe Refashion Spring 2010 Pledge
I Melbourne Belle pledge that I shall abstain from the purchase of "new" manufactured items of clothing, for the period of 2 months.
I pledge that I shall refashion, renovate, recycle preloved items for myself with my own hands in fabric, yarn or other medium for the term of my contract.
I pledge that I will share the love and post a photo of my refashioned, renovoted, recycled, crafted or created item of clothing on the Wardrobe Refashion blog, so that others may share the joy that thy thriftiness brings! Signed
Melbourne Belle
My personal goals for Spring 2010 are:
1. sew from stash
2. work through my refashions-in-waiting collection, and
3. Tackle (or trash) some UFOs.
Saturday, August 28, 2010
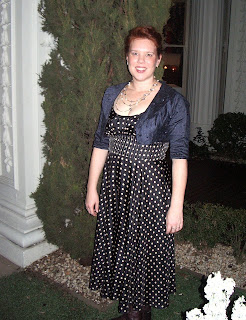
Back on the re-fashion Wagon
I've signed up for another 2 months Wardrobe Refashion, kicking off on September 1, and to celebrate, here are some photos of me at a recent wedding. My dress is a navy blue with bone polka dots dress by Husk, which I found in a local second hand clothing boutique. The blue bolero has been in my collection for a while, and probably came from an op-shop. The necklace is a Fiji souvenir, and the brown boots are Target.


Friday, July 23, 2010
Wrap skirt
The weekend before we left for Fiji I decided I needed one more garment, either a skirt or shorts. I had some light weight printed cotton in my collection that worked well with the palette of my Fiji wardrobe. After letting it sit on the couch amidst the rest of the Fiji wardrobe for a few days, I decided it was skirt fabric.

I chose New Look 6637. The envelope says "Easy 2 hours" and while the construction is easy, it seems to me that the "2 hours" refers to time spent on construction, exclusive of cutting the fabric etc.
Once I had cut out the skirt pieces I decided the fabric was too lightweight - I was worried about transparency - so I underlined it with scraps of poplin from other projects.
All in all the project took me about 7 1/2 hours, but I did stop for meals, laundry etc. I think its the first time I've started and finished a fashion garment in the same day.
I'm quite happy with the finished garment, and will probably make 1 or 2 more for the Aussie summer. Perhaps I'll even make one a tiny bit shorter. I might also alter the side seams to give it a slightly more A-line finish, if I remember.
I am glad I added the underlining, as I think it would have been not only transparent, but a little fly-away without the extra weight.

Saturday, June 26, 2010
Vintage Butterick 6621 - skirt
I may have mentioned here that I am currently on a weight-loss journey that has seen me drop at least a dress size since Christmas. I hope to drop one more before the end of the year. This, of course, means I am shrinking out of my clothes, in particular, skirts and trousers. Recently I realised that I have nothing suitable to wear in the events of external meetings or job interviews (my current contract expires early November).
My grey suit jacket still fits reasonably well, but the skirt that matches it is unflatteringly and uncomfortably large. Remembering that I had some grey patterned fabric that was gifted to me years ago, I turned to my pattern collection for inspiration and came up with this:

Notice how in each picture the model wears her jacket buttoned up? Now I know why - the skirts and pants all have gathered elasticised waists. Of course, had I bothered to read the garment descriptions when I bought the pattern I'd have know that all along. Gathered waists are not normally my style, but as it turns out, might be just the thing while I am "between sizes" as I can cinch in the the waists without having to significantly alter or unpick the garment.


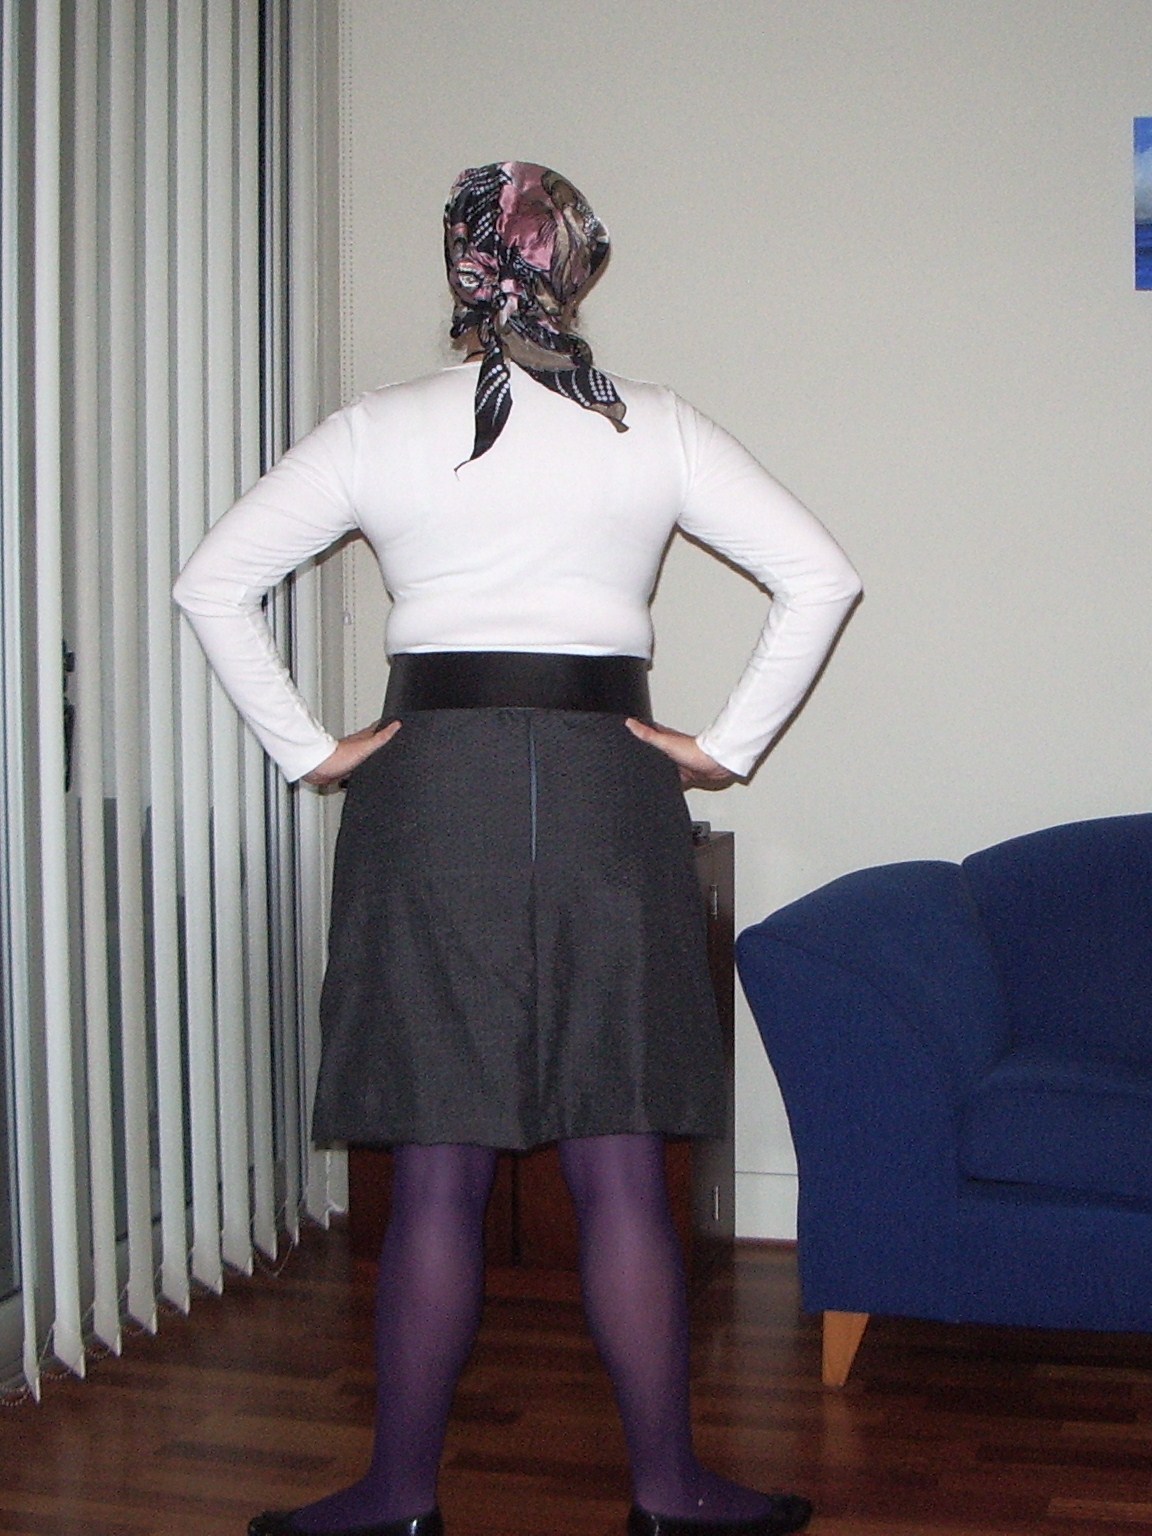
And so, here is my first attempt at Butterick 6621:
Hmm, that invisible zipper in the back isn't as invisible as I thought.
I've styled it here with a belt to cover the gathered waist. This is how I wore it to work on Friday. I'll post pics of it styled with my suit jacket for a more formal look next week
I'm not sure I'm loving the centre front seam. Perhaps its just not the best fabric choice for this project. I might try it again with a more drapey fabric. And I'll also experiment with tweaking the pattern to cut the front as one panel. But its comfy, and based on this success, I will also try out the other garments in the wardrobe, perhaps for a spring capsule collection.

My grey suit jacket still fits reasonably well, but the skirt that matches it is unflatteringly and uncomfortably large. Remembering that I had some grey patterned fabric that was gifted to me years ago, I turned to my pattern collection for inspiration and came up with this:

Notice how in each picture the model wears her jacket buttoned up? Now I know why - the skirts and pants all have gathered elasticised waists. Of course, had I bothered to read the garment descriptions when I bought the pattern I'd have know that all along. Gathered waists are not normally my style, but as it turns out, might be just the thing while I am "between sizes" as I can cinch in the the waists without having to significantly alter or unpick the garment.

And so, here is my first attempt at Butterick 6621:
Hmm, that invisible zipper in the back isn't as invisible as I thought.
I've styled it here with a belt to cover the gathered waist. This is how I wore it to work on Friday. I'll post pics of it styled with my suit jacket for a more formal look next week
I'm not sure I'm loving the centre front seam. Perhaps its just not the best fabric choice for this project. I might try it again with a more drapey fabric. And I'll also experiment with tweaking the pattern to cut the front as one panel. But its comfy, and based on this success, I will also try out the other garments in the wardrobe, perhaps for a spring capsule collection.

Tuesday, June 15, 2010
Coming soon - Travel wardrobe
Inspired by (a) Gertie of Gertie’s New Blog for Better Sewing and (b) the mini wardrobe challenge I am starting to think about a capsule collection for my imminent Fiji holiday. We plan to leave in 2 ½ weeks, and instend to be away for ~10 days. It has rather snuck up on me; therefore, I am trying to tell myself I cannot possibly make an entire new holiday wardrobe in that time. Instead, I will compile a collection from my current closet, and perhaps expand and accent it with a few carefully chosen sewing projects.
Stay tuned for pics of the starter collection this weekend.
Stay tuned for pics of the starter collection this weekend.
Sunday, June 13, 2010
ALF supporter gear
So I've been seeing (coveting) the official Essendon FC Earflap Beanie around the games. Attending outdoor football games in winter in Melbourne means lots of layers to keep warm. I always have trouble with drafts down the back of the neck and behind the ears. (Does anyone else get cold backs of ears in winter?)
I did have a(n unofficial, unlicensed) supporter beanie, but it did not have earflaps. I also had an old black t-shirt of Hubby's, and some red thread. Now I have this:

It probably took about 2 hours work all up.
It's not quite as sleek as the official one (I tried to post a pic but the cut and paste didn't work. It's over here if you are really interested http://www.essendonfc.com.au/bombershop/product.asp?bshop=2010061322143237&id=1349&scat_id=32 ), but it's unique and will do the job. Although I did just bust Hubby reclining on the lounge in it, so I might have to make a companion one for him.
Friday, June 11, 2010
Days 4 & 5
So I have come to the end of the 5 day challenge, and still have not tried out all the combos I had in mind. Perhaps I'll wash everything and do another few days later in the month.
Day 4 was back to trousers, this time paired with the black knit top, watch pendent and ankle boots.

Day 5 - Friday - was red plaid skirt, white top, aqua cardi, watch pendent and scarf.
I tried to do a Grace Kelly head scarf.

 I think we can agree it did not work. It is handy to have a scarf to put around my neck or shoulders in the office when it gets cool, so I was glad I stuck it in my handbag.
I have enjoyed wearing this red skirt this week, except that the lining is badly torn, and there is nothing like bending over at work to pick something up, and hearing it rip just a little bit more. I think I will remove it entirely, and instead invest in a few half slips/petticoats to wear under it.
Day 4 was back to trousers, this time paired with the black knit top, watch pendent and ankle boots.

Day 5 - Friday - was red plaid skirt, white top, aqua cardi, watch pendent and scarf.
I tried to do a Grace Kelly head scarf.

 I think we can agree it did not work. It is handy to have a scarf to put around my neck or shoulders in the office when it gets cool, so I was glad I stuck it in my handbag.
 I have enjoyed wearing this red skirt this week, except that the lining is badly torn, and there is nothing like bending over at work to pick something up, and hearing it rip just a little bit more. I think I will remove it entirely, and instead invest in a few half slips/petticoats to wear under it.
Wednesday, June 09, 2010
Mini Wardrobe Challenge Day 3
Today's outfit was: black dress - grey long sleeved t-shirt - black knee boots - vintage belt worn as necklace. I later added the scarf when it was cool in the office.


Tuesday, June 08, 2010
Mini Wardrobe Challenge Day 2
Firstly, I was out and about this afternoon so thought I'd take an outfit shot 'on location'. But since I felt a bit goofy taking photos of myself in Magnation, I only took one, and it ain't my best work (I seem to be really sticking my tummy out. Note to self: poor posture = poor photos).
Today's outfit comprised: black knit top - red plaid wool skirt - black knee boots - vintage belt - pendant watch - outer layer

Today's outfit comprised: black knit top - red plaid wool skirt - black knee boots - vintage belt - pendant watch - outer layer

Monday, June 07, 2010
Mini Wardrobe Challenge - the collection
Brain is too tired to figure out how to put words in the other post. I think I have to do words first then add photos. Anyway, I have made my decisions for this 5-day challenge.
My 10 "core items" (inclusding shoes) are:
Navy blue trousers - black dress with white detail - red/aqua check skirt (making its debut in my wardrobe having bene recently thrifted) - white long sleeved t-shirt - grey long sleeve t-shirt - black knit turtle neck top - black ankle boots - black knee boots - aqua cardi (also making its debut after being refashioned)
And I have decided that the last "item" is a collection of items I am calling my outer layer: brown vintage coat - black scarf - black beret - black leather gloves. Since I don these when I leave a building and remove them when I arrive at my destination, I have decided they can be one item, and will only be featured in today's outfit post.
My 5 accessories are:
one square scarf with martime themed prints (also on debut) - pendant watch - vintage metal belt - diamond earrings - every day brown leather bag.
I have also decided not to count my wedding/engagement/good wife rings as accessories as they are non-negotiable.


Sunday, May 30, 2010
Capsule Winter Wardobe Challenge
I have recently discovered the blog 'The Small Fabric of My Life' here at blogspot. I found Small Fabric via wardrobe_remix over at flickr, in a disucssion of her recent Spring Capsule Wardrobe Challenge. Her next challenge kicks off 7 - 11 June. The author (who I assume lives in the Northern Hemisphere) has amended her 'traditional' rules for the summer challenge; however, since it's winter here in Oz, and it's my first attempt, I have decided to play along with the challenge, but using the old rules which are as follows:
Choose ten items of clothing from your wardrobe and mix and match them for five days. You can have any combination of shoes, dresses, skirts, tops and jackets as long as it adds up to ten individual items.
You are also allowed five accessories which include jewellery, scarves, bag, belts etc.
Underwear and hosiery do not come under the ten items and five accessories!
So, does anyone else want to play along?
Saturday, May 29, 2010
Simplicity Easy Chic suit – skirt – finished

I actually finished this some weeks ago and have worn it to work a few times. I am quite happy with it on the whole. That is to say, I am happy with my construction and finish. I still need to improve my zipper insertion, and the hemming of the flounce is a bit rough and ready in places. If make this skirt again, I will perhaps finish the flounce hem with my (recently acquired) overlocker, then turn press and stitch the hem.
Now on to fit – I think the fit was quite good when I finished it. Unfortunately, I have shrunk a little since I finished it, so it now seems a bit loose and at risk of slipping lower than is ideal. I fear that in another month or two it will be in the ‘too big’ pile, which is a nice problem to have. 
I can’t be bothered taking it in, as it would require altering both the skirt and waist band facings, so unless anyone I know wants a green flounced skirt in approx. size 16, I might pack it up for charity along with a few other items I shrink out of.
Further on fit, I have determined that, while it fit the way it was designed to, I don’t particularly like skirts that sit so low on the hips. They cut across my tummy , which can be my least favourite feature, and make me feel rather self conscious about my appearance. I do like the idea of the flounced above-the-knee skirt, so if I were to make the garment again, I’d amend the pattern by keeping some or all of the length and bring the darts in so that the skirt sits higher and closer to my actual high hip line.
Sunday, May 23, 2010
Sewing Sunday
This afternoon I focussed on a copuple of UFOs.
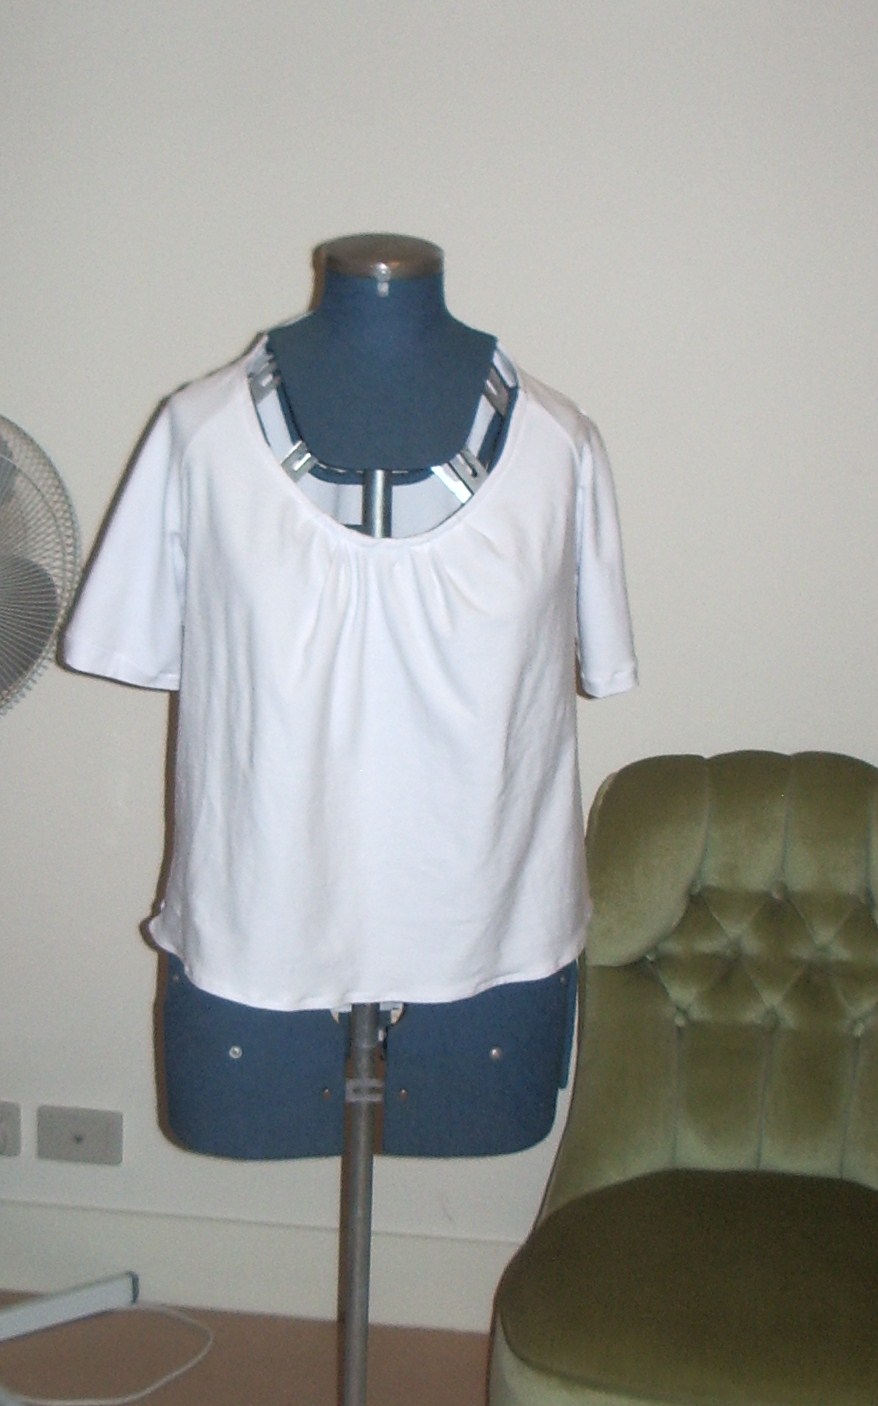
First up, its the 'Make It Work!' t-shirt - Burda 12-2008-113. I chose this project specifically to try out my new overlocker. I used a white 'souffle jersey' remnant I bought 'in case it comes in useful' at Cleggs' remnant sale last year. I maanged to cut the pattern too big, made the seam allowances too small then lost weight, so it was far too big. A few tweaks and fudges later and it's ok - not a great fit but ok. The pattern calls for a self-fabric belt tie, but I didn't have enough left over (and can;t be bothered piecing bits together), so I will style it up with a belt from my collection.

Secondly is a pair of 3/4 length pj pants made from a flanalette-type fabric my sister gave me years ago (it has moved house with us at least once). They have been sitting in a bag, cut an dpinned, for months. I am particularly pleased, not only because its so much faster and easier to make them with the overlocker, but because I will be able to wear them tonight.

Thirdly I started on a pair of Vogue Very Easy stretch pants, but ran out of thread so I will have to either find or buy an additional spool before I can progress those.
Finally, I have decided to refashion an aqua top I got from a clothing swap party a few years ago, then promptly stained. Here is a before photo:

First up, its the 'Make It Work!' t-shirt - Burda 12-2008-113. I chose this project specifically to try out my new overlocker. I used a white 'souffle jersey' remnant I bought 'in case it comes in useful' at Cleggs' remnant sale last year. I maanged to cut the pattern too big, made the seam allowances too small then lost weight, so it was far too big. A few tweaks and fudges later and it's ok - not a great fit but ok. The pattern calls for a self-fabric belt tie, but I didn't have enough left over (and can;t be bothered piecing bits together), so I will style it up with a belt from my collection.
Secondly is a pair of 3/4 length pj pants made from a flanalette-type fabric my sister gave me years ago (it has moved house with us at least once). They have been sitting in a bag, cut an dpinned, for months. I am particularly pleased, not only because its so much faster and easier to make them with the overlocker, but because I will be able to wear them tonight.

Thirdly I started on a pair of Vogue Very Easy stretch pants, but ran out of thread so I will have to either find or buy an additional spool before I can progress those.
Finally, I have decided to refashion an aqua top I got from a clothing swap party a few years ago, then promptly stained. Here is a before photo:

Tuesday, May 18, 2010
Fly-by post
Goodness, it's half-past May already! I do have a couple of completed projects to showcase: the green skirt and the purple lace belated-birthday dress of FRUSTRATION.
I will do my best to photo and post them this weekend. Now that winter is closing in its harder to get good photos on weekdays - no daylight!
Also on the agenda this weekend I think are a few UFOs and some mending. And perhaps a refashion/renovation.
We will see!
I will do my best to photo and post them this weekend. Now that winter is closing in its harder to get good photos on weekdays - no daylight!
Also on the agenda this weekend I think are a few UFOs and some mending. And perhaps a refashion/renovation.
We will see!
Sunday, March 14, 2010
Instant Gratification sewing
Since my sewing time this weekend was re-allocated to other important activities like napping and hanging out with friends, and since we are in for a hot spell this week, - perhaps the last of autumn – I decided to spend my 2 sewing hours today renovating 2 pr of trousers into shorts for hubby (at his request). I am very happy with the results, as is hubby.
I then took one of the cut-off legs and turned it into a pouch to go in hubby’s book bag for his wallet and phone. Hopefully he won’t have to spend as much time fishing them out of the bottom of the bag now.
I then took one of the cut-off legs and turned it into a pouch to go in hubby’s book bag for his wallet and phone. Hopefully he won’t have to spend as much time fishing them out of the bottom of the bag now.
Saturday, February 27, 2010
Simplicity easy chic suit skirt part 2


Today’s Sewing Philosophy: stop, look, and listen (to yourself).
Today I have stitched the darts and side seams. The last time I made this skirt it turned out too big, and even though I’ve taken it in to sit properly on my hips, it still feels a bit ‘baggy’ and frumpy. So I made sure to stop and try on after I did the side seams this time. As you can see from the first 2 photos, it still looks a bit loose, especially around the hips. Before going any further, I thought I’d pin the flounce on to see how that affected the overall look. I am glad I did – look how frumpy this is!
Looking at the pattern envelope, the skirt is supposed to stop mid patella. I re-pinned a few times until I got the length right. This told me I needed to take out a (whopping) 7 cm of length. That was more than I thought I could manage by just pinning and cutting. So I unpicked the side seams, folded the pattern at the designated spot, pinned the darts in the pattern, laid the paper pattern over the fabric, and re-cut the pieces.
I then re-stitched the side seams, and have decided that is enough for today.
P.S. Photos apear to have uploaded in reverse order - opps!
Saturday, February 13, 2010
Simplicity easy chic suit 4885: Part 1

First things first – the pattern:
http://www.simplicity.com/Search.aspx?SearchTerm=4885&x=0&y=0
I have previously made the pants, quite successfully and the skirt, less successfully. I have a First Draft* of the jacket and a muslin of the top on the mannequin, and it’s my intention to make a complete 3 piece suit form this pattern together with a couple of the tops.
I decided to have another go at the skirt, using some mystery green suiting fabric that has matured nicely in my collection. I checked my measurements and decided that I fall between the 20 – 22 sizes on this pattern. Then I remembered something from Carolyn’s interview on Gertie’s blog, and took my waist, hip and thigh measurements while sitting down – after all, I want this to be a skirt for working, and I work sitting down. Based on the sitting measurements, I decided to cut the size 22. If it turned out too big (as the first one did) I could always cut it down half-a-size.
After cutting the pieces, I pinned together the main skirt part, leaving off the flounce. Looking in the mirror, standing, walking and sitting, it seems to be the right size.
Next I cut the interfacing and pinned it to the skirt facings. That’s enough work on the skirt today.
Next I returned to the top muslin. I had previously pinned it in where I thought it was a bit loose around the bust/back. Again keeping Carolyn’s advice in mind, I tried the top on sitting down. This helped me to decide that I had taken it in too much and it was a little bit too snug for sitting and typing in at work. So, I will be taking it in about 2 ¾ cm at each underarm seam, but only at the under arm for about 4 -5 cm; the rest seems right. Next I’ll sew up the new seams, and get Hubby to pin me in where the zip goes to double check.
Finally, I pinned in the shoulder pads I bought for the jacket. I had previously suspect the shoulders are too broad, and with the shoulder pads in pace, I am quite sure they need to be taken in by about 1.5 cm. SO I have unpicked the sleeves and will be fiddling with about resetting them in an effort to find the right fit.
*A First Draft is when I hope to both work out fit issues and that the garment turns out presentable and wearable, but use inexpensive fabric in case I have to bin it.
Tuesday, February 09, 2010
skirt + top = summer frock


I bought the skirt part of this dress on sale at a Salvos that was closing down. It was the first thing I bought expressly to re-fashion. It was a size 12, i.e. 2 sizes too small for me, but I liked the colour, shape and nifty embroidery detail at the hem. I started by removing the waistband, leaving me with 3 tiers. I was going to combine it with a men's business shirt I bought at the same time to make a shirt-dress, but I couldn't figure out how to do it nicely.
The top was #3 in a series of 4 tops made from a Very Easy Vogue pattern. It was a bit gapey at the front and I was not very happy with it. Although it didn't photo so well, I quite liked the narrow stripes, and thought I'd keep it as a vest to wear over long sleeved tops in the winter. When the shirt-dress was obviously not coming together right, I thought of this top instead.
A quick finish of the skirt's raw edges, another quick hem around the waist/hip line and voila a new summer dress!
Sunday, February 07, 2010
A new jacket at Salvos

2 Saturdays ago, quite on a whim, Hubby and I stopped by our local Salvos shop. We found loads of things for him, as we always seem to do and a few for me too: 3 patterns, a length of fabric, and a brand new with tags on “Mechanical Jacket” from emerge brand.
A quick Google tells me that emerge is sold through ezibuy. The tag says RRP $49.95, and I got it for $15. I wonder if someone bought it, was not happy with it, and then never got around to returning it, so it ended up donated. So even though its form an op-shop, since it’s brand new I feel I ought to hand over my get-out-of-jail-free card (I lasted a month! But it’s my first pledge).
I have also been sewing and have a refashion semi-complete to show you all in the next week or so. My M-i-L has been visiting, so no sewing for me this weekend, but we did buy her a vintage dressing gown pattern.
Sunday, January 31, 2010
A sheer adventure


This blue blouse is a ‘first draft’ of Burda pattern ... Unlike a muslin, which is for working out pattern tweaks and is never intended to be worn outside the fitting room, when I make a first draft I use nice but inexpensive material, in the hope of ending up with a wearable garment, but prepared to bin it if it’s a disaster.
The fabric is a remnant of cornflower blue ‘soufflé georgette’ that I bought on sale at Cleggs specifically for this project. I decided to do a first draft for a few reasons. My old machine doesn’t like lightweight fabrics, so I haven’t really worked in sheers or light fabrics before, and the pattern calls for silk or cotton batiste, which I understand to be quite fine. Also I was not convinced that this shape was going to be flattering on me. Third, I am still figuring out my Burda size. According to my measurements I fall between sizes 46 and 48. In Burda world that puts me into the ‘plus’ size range; however, since I am smaller on top than on bottom, with a little tweaking I think I can make some of the size 46 tops work for me. This top, and my brown kit cardigan jacket, are both size 46, and are both loose and unstructured, which I think is why they work. For this one, I added about 1.5 cm at the entre fold front and back, resulting I suppose ion an additional 6 cm all around, as font and back were cut on the fold. (it was unclear from the instructions if I was supposed to add width here, but I could tell from the tissue fit that it would be too snug without it).
The pattern is quite simple and went together fairly easily. I trialled a few flashy finishing stitches on the cabbage, but given how light the fabric is, they didn’t really take, and rather than spend sewing time faffing about with tension and whatnot, I mostly stuck with straight and zig-zag stitches. I zig-zagged the seams to prevent fraying, then pressed them to the back as much as possible. The straight stitching caused a gathering effect, most noticeable on the shoulder/top of arms seams. I am not sure if that is supposed to happen, or typically happens, but the effect is quite nice.
I left it too late to research how to mitre the neck band, and consequently had applied it incorrectly,. The finish is no as neat as it could have been, but is probably only noticeable to me (and now to my readers).
Saturday, January 23, 2010
My First Official Re-fashion


Here is my first Wardrobe Re-fashion entry. Take one yellow promotional shirt, plus the cabbage from the orange knit top, to make a colour block skirt just like on the catwalks – well, maybe.
Next time I’ll remember t shape the waistband before attaching it to the skirt portion, making sure to include a sway back adjustment.
Wardrobe Refashion Pledge
The Pledge
I Belle pledge that I shall abstain from the purchase of "new" manufactured items of clothing, for the period of 2 months, starting 1 Jan 2010. I pledge that I shall refashion, renovate, recycle preloved items for myself with my own hands in fabric, yarn or other medium for the term of my contract. I pledge that I will share the love and post a photo of my refashioned, renovoted, recycled, crafted or created item of clothing on the Wardrobe Refashion blog, so that others may share the joy that thy thriftiness brings!
Signed: Belle.
Sunday, January 10, 2010
Taking a leaf from Botticelli Babe’s book


Botticelli Babe has resolved to maintain her commitment to fine construction detail in 2010, following on from her commitment to take time to finish garments neatly in 2009. Go say hi to her - http://botticellicraft.blogspot.com/
I find myself inspired to do the same.
Monday I wore my new knit top (4th in a series of 4 made from the same pattern, in different fabrics, of which 2 fit really well, one is a bit loose and one turned out a bit big and gapes, which I blame on the fabric). The knit is a burnt orange colour and I did the construction seams using an orangey-gold coloured thread from an earlier project. I also tried out a couple of stitches for the first time – the stretch straight stitch and the single overcast stitch – which gave an extra neat and secure finish to my seams, without adding any bulk.
When it came to topstitching the neck and arm holes and the hem, I toyed with using the orangey-gold thread as an accent or design feature, but in the end wound some orange thread onto the bobbin that was a much closer match to the fabric. I am glad I did as I am very pleased with the finished garment. And as further proof that I made the right choice, a colleague told me that the top does not look like it is homemade – which I take to mean it looks RTW.
Subscribe to:
Posts (Atom)